Taro Pistachio Entremet Recipe
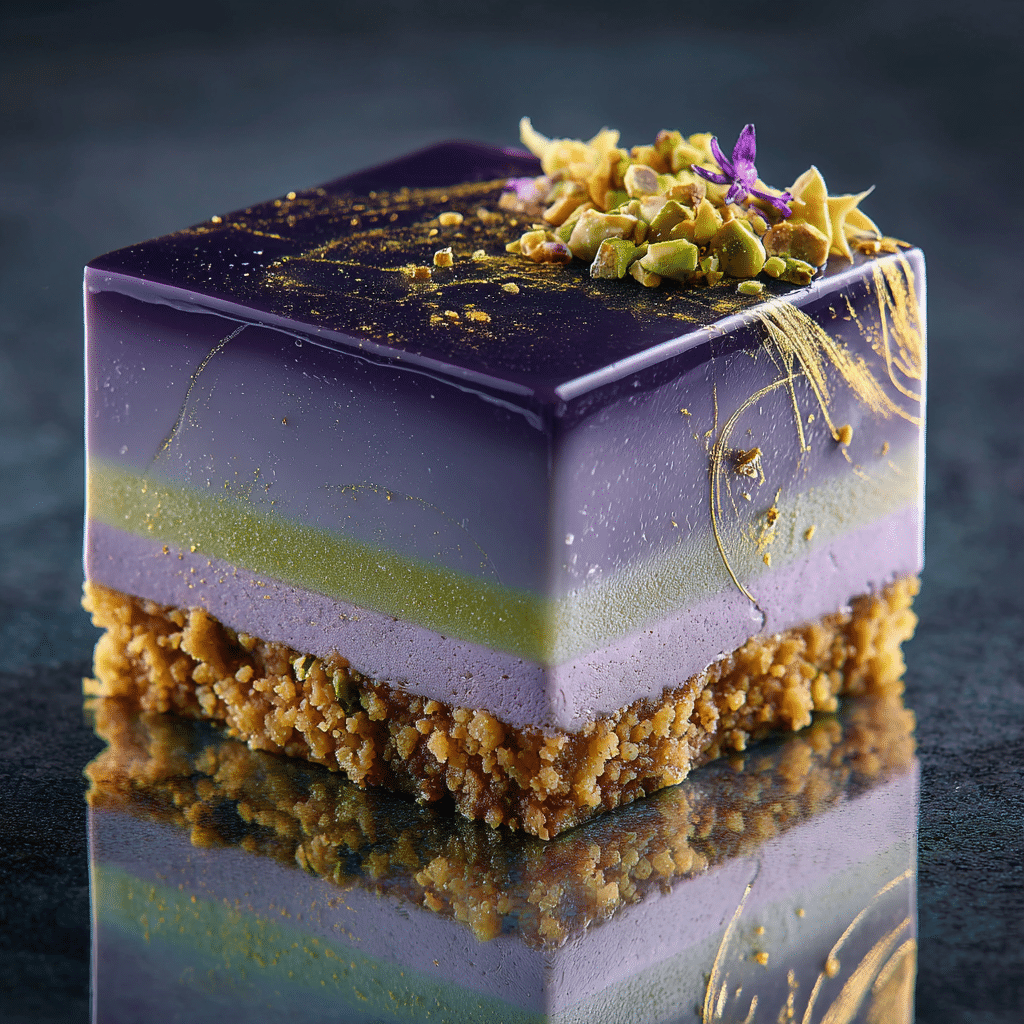
Indulge in the charming delight of the Taro Pistachio Entremet, a stunning dessert that brings together the subtle sweetness of taro and the rich nuttiness of pistachio in perfect harmony. This entremet is a true feast for the eyes and the palate, showcasing layers of moist pistachio sponge, airy taro mousse, and a delicate white chocolate crunch, all cloaked beneath a glossy mirror glaze in soothing shades of purple and green. Whether you’re treating yourself or impressing guests, this elegant creation offers a beautifully balanced texture and flavor experience that feels both sophisticated and comforting.

Ingredients You’ll Need
Though the Taro Pistachio Entremet might look like a showstopper, its ingredients are refreshingly straightforward. Each component plays a vital role—from the nutty pistachios adding depth and texture, to the creamy, subtle taro giving the mousse its signature pastel hue and smooth flavor.
- Pistachio flour: Provides a rich, nutty base for the sponge, enhancing both flavor and moisture.
- All-purpose flour: Gives structure to the sponge layer while keeping it light.
- Eggs: Essential for the sponge’s airy yet stable texture.
- Sugar: Balances flavors and caramelizes slightly in the sponge for depth.
- Butter: Adds luscious richness to the sponge and crunch layers.
- Taro puree: The star ingredient for the mousse, offering a natural sweetness and pastel purple color.
- Heavy cream: Whipped to create that fluffy, melt-in-your-mouth mousse texture.
- Gelatin: Ensures the mousse sets perfectly without being dense.
- White chocolate: Incorporated both in the crunch layer and the mirror glaze for sweetness and sheen.
- Crushed pistachios: Used for garnish, adding a delightful crunch and vibrant green accents.
- Edible gold leaf: For that touch of luxurious sparkle on top.
- Food coloring (optional): Enhances the natural hues if desired, keeping it elegant.
How to Make Taro Pistachio Entremet
Step 1: Prepare the Pistachio Sponge
Start by whisking eggs with sugar until they reach a light, fluffy consistency—this is the foundation of your sponge’s airy texture. Gently fold in sifted pistachio flour and all-purpose flour to maintain that delicate crumb, then incorporate melted butter warmed just to the right temperature. Pour your batter evenly into a lined cake pan and bake until golden with a slight springy bounce. This sponge not only tastes amazing but also provides the nutty canvas for the entremet’s layers.
Step 2: Make the Taro Mousse
While the sponge cools, soften gelatin in cold water, then gently dissolve it in warm taro puree. Whip the heavy cream to soft peaks and carefully fold it into the taro mixture, keeping the mousse light, airy, and full of that smooth taro flavor without overpowering sweetness. This luscious mousse will float perfectly atop the pistachio sponge layer.
Step 3: Create the White Chocolate Crunch Layer
A playful textural contrast awaits in this step. Melt white chocolate and mix it with crushed crisped rice or fine cookie crumbs for that irresistible crunch beneath the mousse. Spread this mixture over the cooled pistachio sponge and refrigerate until firm. This layer adds a delightful surprise of texture that complements the creamy mousse beautifully.
Step 4: Assemble and Freeze the Entremet
Gently layer the mousse over the crunchy white chocolate base placed atop the pistachio sponge inside a springform or silicone mold. Smooth the surface, then cover and transfer the entire entremet to the freezer for 4–5 hours. Freezing ensures clean slices and a flawless finish when you eventually glaze and garnish the dessert.
Step 5: Prepare and Apply the Mirror Glaze
Once frozen solid, pour a silky white chocolate mirror glaze tinted lightly with pastel green or purple over the entremet, watching it cascade in a glossy, flawless coat that seals in all the layers beneath. This glaze isn’t just about aesthetics—it locks in moisture while visually elevating your creation to patisserie-level perfection.
Step 6: Garnish Your Taro Pistachio Entremet
The final flourish is all about elegance and texture. Sprinkle crushed pistachios generously along the edges and delicately place edible gold leaf atop the smooth glaze to catch the light. This finishing touch brings both a textural crunch and a luxurious shimmer that perfectly complements the nutty flavor profile.
How to Serve Taro Pistachio Entremet

Garnishes
To enhance the presentation, a sprinkle of crushed pistachios offers a lovely color contrast and crunchy texture. Edible gold leaf makes each slice feel like a celebration piece, elevating your dessert from delicious to dazzling. Fresh mint leaves can also provide a subtle aromatic lift to the nutty flavors.
Side Dishes
Pair your Taro Pistachio Entremet with a light and refreshing fruit salad, perhaps with citrus elements that balance the richness, or a small scoop of coconut sorbet to echo tropical notes in the taro. These accompaniments keep the palate intrigued without overshadowing the main event.
Creative Ways to Present
For a stunning tablescape addition, serve individual portions on white porcelain plates, garnished with edible flowers and a drizzle of pistachio-infused syrup. Alternatively, slice it into neat rectangles for a modern twist at a dinner party. The soft color palette of the entremet lends itself beautifully to minimalist plating, ensuring all eyes remain on the dessert.
Make Ahead and Storage
Storing Leftovers
Once assembled, the Taro Pistachio Entremet keeps beautifully in the refrigerator for up to 3 days. Cover it gently with a dome or plastic wrap to maintain moisture and prevent absorption of other aromas. This dessert actually benefits from a day in the fridge, which allows the flavors to meld even further.
Freezing
Because the entremet is designed to be frozen initially, it freezes exceptionally well for up to one month. Keep it tightly wrapped in plastic wrap and placed in a sturdy container to avoid freezer burn. When ready to enjoy, simply thaw overnight in the refrigerator to preserve its delicate mousse texture and glossy finish.
Reheating
Reheating isn’t necessary or recommended for the Taro Pistachio Entremet. Serve it chilled or at room temperature for the best flavor and texture. Warming this dessert would soften the mousse and diminish the crisp contrast of the chocolate crunch layer.
FAQs
Can I use other nuts instead of pistachios in this entremet?
While pistachios bring a unique flavor and color, you can experiment with almonds or hazelnuts, though the taste and aesthetic will shift. Keep in mind these nuts won’t replicate the exact nutty complexity or the lovely green hues.
Is it possible to make this gluten-free?
Yes, by substituting all-purpose flour with a gluten-free blend you can maintain the sponge’s structure. Ensure your gluten-free flour mix includes xanthan gum or another binder for the best texture.
What if I can’t find taro puree?
You can make taro puree at home by steaming or boiling fresh taro root until soft and then blending it until smooth. Just be mindful to cook thoroughly to avoid any bitterness and achieve that silky texture.
Can the mirror glaze be made ahead?
The mirror glaze is best made fresh on the day you plan to glaze your entremet. However, you can prepare it a day in advance and keep it refrigerated, gently warming it to the right pouring consistency before use.
How do I prevent the mousse from becoming grainy?
Careful folding of the whipped cream into the taro puree and evenly dissolving the gelatin are keys to a smooth mousse. Avoid overmixing as it can deflate the cream or cause separation, leading to a less silky texture.
Final Thoughts
There is something undeniably special about crafting and savoring the Taro Pistachio Entremet. This dessert brings together beauty, flavor, and texture in a way that feels both indulgent and approachable. Whether for a festive occasion or a luxurious treat, I encourage you to try making this elegant yet comforting entremet—the joy it will bring is absolutely worth the effort!